CI/CD Project
CI/CD Pipeline Project
This project is your chance to spend some dedicated time building out a CI/CD pipeline of your own.
You'll use all the key skills you've learned, and:
- 😣 you will get stuck
- 💥 you will have errors and broken apps
- 📑 you will need to research and troubleshoot
That's why the project is so useful!
It will help you understand which areas you're comfortable with and where you need to spend some more time.
And it will give you a pipeline that you built yourself, which you can use as a reference when you're working with CI/CD on a real project.
ℹ There are multiple parts to the project - you're not expected to complete them all. Just get as far as you can in the time, it's all great experience.
Part 1 - Welcome to Widgetario
Widgetario is a company which sells gadgets. They want to run their public web app in a cloud native platform. They've settled on Kubernetes, so the first step is to build some container images for the application components.
Here's the application architecture:
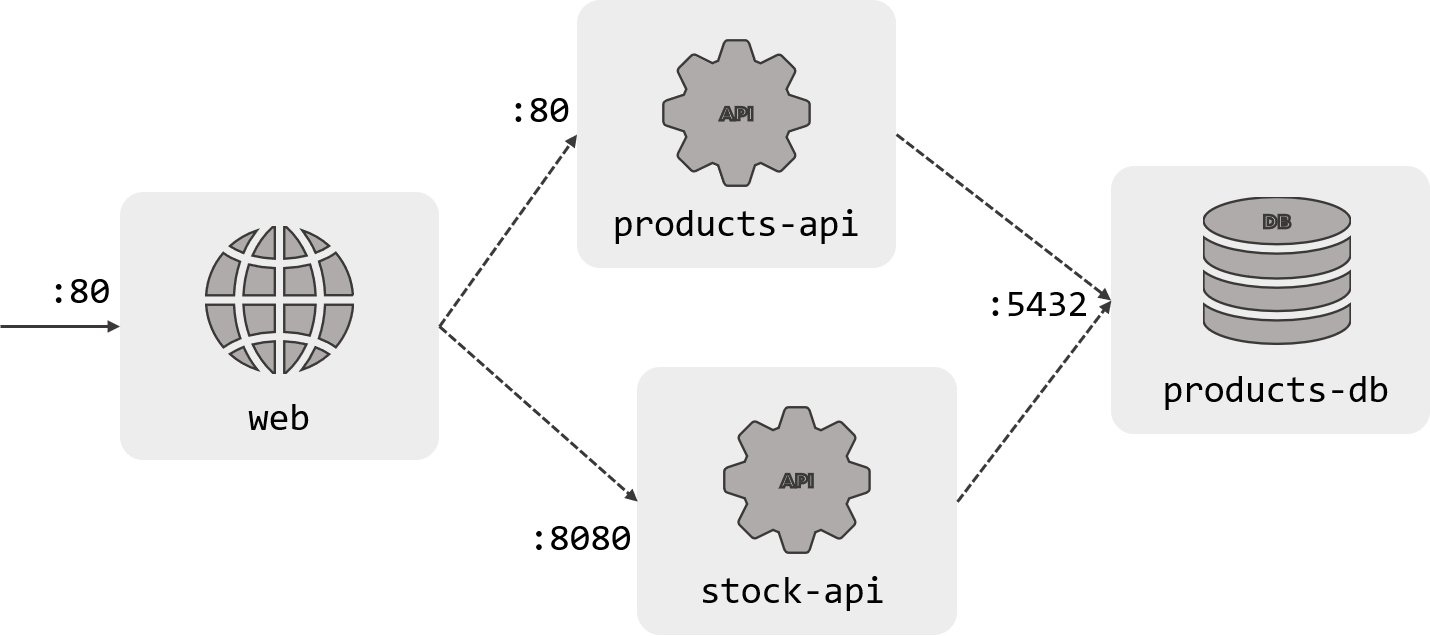
There are four components to the app, each will need its own Docker image. The source code is in the project/src folder, and each component has a Dockerfile which needs to be completed in the project/docker folder:
-
Products database - a Postgres database, built with some sample data (db/Dockerfile)
-
Products API - a Java REST API which reads from the Products database (products-api/Dockerfile)
-
Stock API - a Go REST API which also reads from the Products database (stock-api/Dockerfile)
-
Website - an ASP.NET Core website which uses the Products and Stock APIs (web/Dockerfile)
You should be able to get all the components to build without any errors
🥅 Goals
-
Build a Docker image for each component
-
Verify you can run a container from each image
-
The containers should start - most will print application logs, one will exit with errors, that's OK
-
You don't need to run all the containers and test the whole app at this stage
📚 Reference
-
Building Container Images covers the basics of the Dockerfile
-
Multi-Stage Builds looks at compiling from source code in containers
💡 Hints
We have the source code so you'll want to use multi-stage builds for the application components (except the database).
The build steps are already written in scripts, so your job will be to find the right base images from Docker Hub and copy in the correct folder structure. If you stick to the existing structure (project/src and project/docker) it will be easier to compare your work to the sample solution.
Make sure you only use official images for your apps :)
🎯 Solution
If you didn't get part 1 finished, you can check out the sample solution from solution/part-1:
-
Products database Dockerfile
-
Products API Dockerfile
-
Stock API Dockerfile
-
Website Dockerfile
Copy from the sample solution to the project directory - this makes a backup of your folder first:
mv project/docker project/docker-part1.bak

cp -r solution/part-1/docker project/
Then build the images and run containers - make sure you use the project directory as the context so Docker can access the src and docker folders:
Database
docker build -t widgetario/db -f project/docker/db/Dockerfile ./project

docker run --rm -it widgetario/db

# you should see log entries about tables being created and the database being ready to accept connections

# ctrl-c/cmd-c to exit
Products API
docker build -t widgetario/products-api -f project/docker/products-api/Dockerfile ./project

docker run --rm -it widgetario/products-api

# you should see log entries for the Spring Boot app starting

# then the app errors because it can't find the database and the app exits - this is OK
Stock API
docker build -t widgetario/stock-api -f project/docker/stock-api/Dockerfile ./project

docker run --rm -it widgetario/stock-api

# you should see a log saying the server is starting

# ctrl-c/cmd-c to exit
Website
docker build -t widgetario/web -f project/docker/web/Dockerfile ./project

docker run --rm -it widgetario/web

# you won't see any logs here but the container should stay running

# ctrl-c/cmd-c to exit
Part 2 - Application Modelling
We've made a good start - all the components are packaged into container images now. Your next job is to get it running in Docker Compose so Widgetario can see how it works in a test environment. You should be able to run the app and browse to the site on your local machine.
Your Compose definition should also include all the build details, so you can build all the images with a single docker-compose command. Remember the Compose syntax lets you inject environment variables into values (like image names) which will be useful when we go on to build with Jenkins.
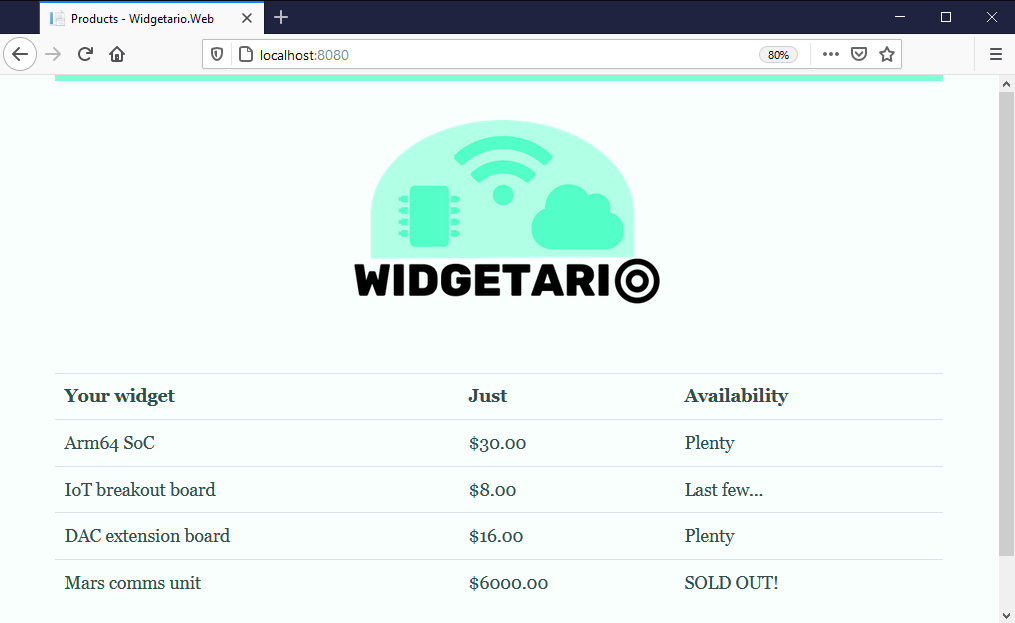
You should put your Compose file(s) in the project/compose folder. When you're done you should be able to browse to http://localhost:8080 and see this:
🥅 Goals
-
Model the application in Docker Compose
-
Start the whole application with a Compose command and verify the app works
-
Include the build details in the Compose model
-
Build all the application images with a Compose command
📚 Reference
-
Modelling Apps with Compose walks you through using Compose for multi-container apps
-
Building Distributed Apps covers the build parts of the Compose spec
💡 Hints
There's just enough information in the architecture diagram to help: the component names are the DNS names the app expects to use, and the ports specify where each component is listening for traffic.
You don't need to apply any configuration settings in the model, the source code has a default set of config which will work if you model the names correctly.
When you start all the containers, it can take 30 seconds or so for all the components to be ready, so you may have to refresh a few times before you see the website.
🎯 Solution
If you didn't get part 2 finished, you can check out the sample solution from solution/part-2:
-
docker-compose.yml - models the application with variables in the image names
-
build.yml - adds the build details in an override file
Copy from the sample solution to the project directory - this will use your existing Dockerfiles in the project/docker directory and make a backup of your Compose directory:
mv project/compose project/compose-part2.bak

cp -r solution/part-2/compose project/
Build with Compose, using the new image tags:
docker-compose -f project/compose/docker-compose.yml -f project/compose/build.yml build
Run the sample solution:
docker-compose -f project/compose/docker-compose.yml up -d
Check the app at http://localhost:8080
Part 3 - Continuous Integration
Okay, now we have the packaging files and a one-line build script, we can start building out the pipeline. We'll run Jenkins and our own Git server in local containers, so your machine will be the build engine.
First you need to define a simple Jenkins pipeline which fetches the project repo, builds all the images and runs a test by starting containers. Your Compose model from part 2 is the starting point for that.
Run the build server containers from infra/build/docker-compose.yml. When they're up you can browse to Jenkins at http://localhost:8081 and to Gogs (the Git server) at http://localhost:3000; the credentials for both are the same:
- username:
courselabs - password:
student
You should build out your pipeline in the file path project/jenkins/Jenkinsfile and then configure a new pipeline project in Jenkins to run it.
This Jenkins instance has all the tools you need already installed, but it uses the newer version of Compose so the command is
docker composenotdocker-compose
There's a repo already set up in the Git server which you can use if you want to; then the Jenkins pipeline SCM details will be:
- Git URL:
http://gogs:3000/courselabs/labs.git - branch specifier:
refs/heads/main
And you can push your local repo to Gogs using these commands:
git remote add project http://localhost:3000/courselabs/labs.git

git push project main
Remember you'll need to commit your changes and push them again whenever you update local files, so Jenkins can fetch the latest content.
🥅 Goals
-
Create a pipeline to build Docker images for each component, including the build number in the image tag
-
Run the application in the pipeline after the build stage to verify the application starts correctly from the new images
-
Test the containers by making HTTP requests with
wget- the web app has an/upendpoint, the APIs both have/healthzendpoints. They should all return 200-OK status codes once the apps are running.
📚 Reference
-
Automation with Jenkins introduces Jenkins and the Jenkinsfile syntax
-
Building Docker Images with Jenkins walks through using Docker Compose to build applications with Jenkins
💡 Hints
Take your Jenkinsfile one stage at a time - get the images building, then start the containers running and then add your tests. You're certain to have issues with paths or syntax problems, so it's best to start simple and iterate.
When you deploy the containers during the pipeline, remember they're sharing the same Docker engine you use to run other containers. You may get port collisions, so it's good if your test deployment uses different (maybe random?) ports.
The web and API containers will all respond to the wget call - but one of the containers takes a while to start up. Jenkins has try/catch blocks to deal with errors and the sleep step is useful to give things time to be ready.
🎯 Solution
If you didn't get part 3 finished, you can check out the sample solution from solution/part-3:
-
Jenkinsfile - has build, deployment and test sections (called "smoke tests" because they're just a basic test); you'll see there are try/catch blocks to deal with errors and a
postsection to tidy up -
docker-compose.yml - removes the ports so this becomes a generic definition we can use locally and in the pipeline
-
test.yml - publishes random ports for use in the test stage - you'll see the Jenkinsfile uses the
docker portcommand to find out the specific ports for each run
To use the sample solution, start by running the build containers:
docker-compose -f infra/build/docker-compose.yml up -d
Then copy from the sample solution to the project directory - this will use the existing Dockerfiles in the project/docker directory and make backups of your other directories:
mv project/compose project/compose-part3.bak
mv project/jenkins project/jenkins-part3.bak

cp -r solution/part-3/compose project/
cp -r solution/part-3/jenkins project/
Now add all those changes to your local Git server:
git add --all

git commit -m 'Part 3 solution'

git push project main
Log in to Jenkins and create a new pipeline project with these details:
- Git URL =
http://gogs:3000/courselabs/labs.git - branch specifier =
refs/heads/main - Jenkinsfile path =
project/jenkins/Jenkinsfile
Click Build Now and you should see all the images built, the containers started and the tests pass.
Part 4 - Publish
Now we have a CI pipeline, we can extend it to get ready for Continuous Deployment. We'll be deploying to a remote environment, so the next step is to publish Docker images from the build pipeline.
You can use any image registry, but Docker Hub is the easiest (create a free account if you don't have one). You'll need to store your credentials inside Jenkins so it can push images to your account - generating an access token from your Docker Hub account helps keep your password safe.
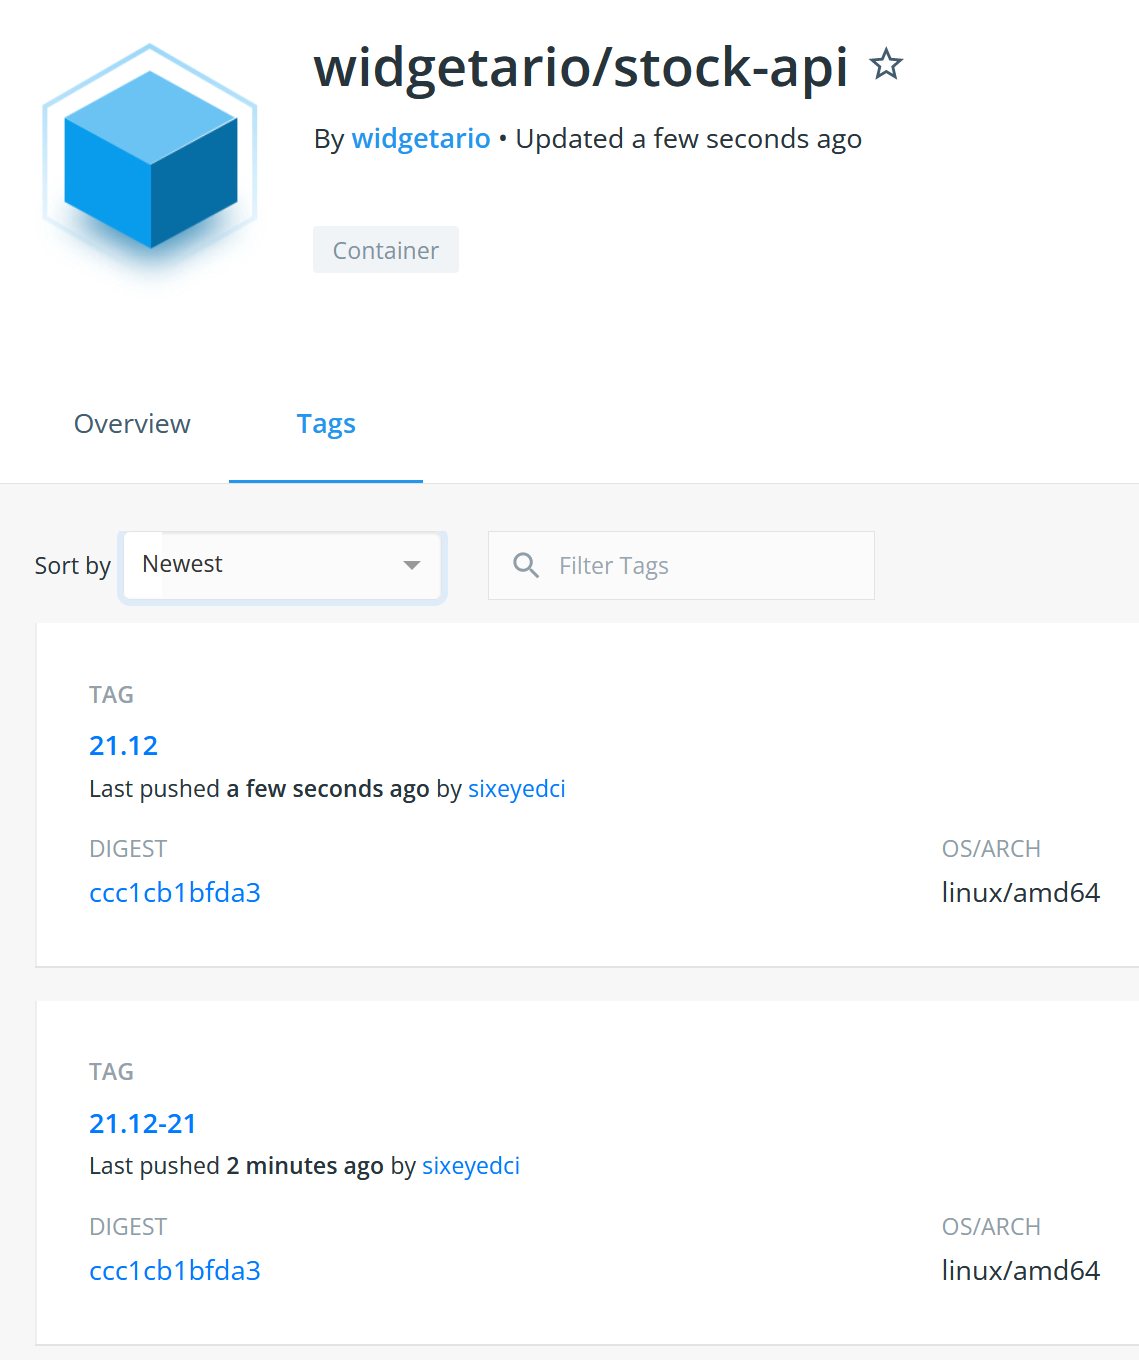
When you push the tags for your new images, it will look something like this:
🥅 Goals
-
Add a publish stage to your pipeline to push the newly-built images to Docker Hub (or your choice of registry)
-
Your images should be tagged with the specific build version (e.g.
:21.12-15) and you should also push the same image with the release cycle as a tag (e.g.:21.12) -
The published images should contain labels with the build version and the Git commit hash, so we have an audit trail from containers back to the build and source code
📚 Reference
-
Accessing Images on Registries covers pushing images and authenticating with registries
-
Building Docker Images with Jenkins includes the details of using environment variables in Jenkinsfiles to construct the image tag
-
Building Apps with Compose has an example of using build arguments to set values for image labels
💡 Hints
Remember that you need to have permission to push an image to a registry - you won't be able to push to the widgetario organization on Docker Hub, so you'll need to set your own account details in your image names.
To get the build number and Git commit into the image labels, you need to traverse down from the Jenkins environment variables through the build arguments in the Compose file down to the arguments specified in the Dockerfiles. You should have defaults configured too, so developers can use the same commands outside of Jenkins.
You'll use a new build stage in the pipeline for the push, so it only happens if the build and test stages complete successfully. You should limit the number of steps you run inside a withCredentials block so the authentication details aren't in scope any longer than they need to be. Any problems should be clear in the job logs - most likely it will be a mismatch between the account details and the image names.
🎯 Solution
If you didn't get part 4 finished, you can check out the sample solution from solution/part-4:
-
Jenkinsfile - adds a push stage which logs in to Docker Hub using the stored credentials and pushes the images which have been built with a versioned tag; a second publish stages builds images with the release tag and pushes them
-
build.yml - adds build version and Git commit arguments to the build, set to load from environment variables or use default values
-
release.yml - overrides the image names to remove the build number - used in Jenkins to push the release tag
-
stock-api/Dockerfile - adds build arguments for the build version and git commit - identical code is in the Dockerfiles for all other components
You'll need to store your Docker Hub authentication in Jenkins - create a Username with password credential called docker-hub.
Then copy from the sample solution to the project directory - this will make backups and then overwrite your existing folders with the solution Dockerfiles, Compose files and Jenkinsfile:
mv project/compose project/compose-part4.bak
mv project/docker project/docker-part4.bak
mv project/jenkins project/jenkins-part4.bak

cp -r solution/part-4/compose project/
cp -r solution/part-4/docker project/
cp -r solution/part-4/jenkins project/
Now add the changes to your local Git server:
git add --all

git commit -m 'Part 4 solution'

git push project main
And run a new build in Jenkins. When it completes you should see your new images listed on Docker Hub, and when you inspect an image you should see the build tags in the labels.
Part 5 - Model for Production
Well, look at that: we have a pipeline which builds from source code, runs a smoke test for the app and pushes versioned deployment packages to a central repository. Soon we'll be ready to add a Continuous Deployment stage.
But first we need to put together another application model, because in production we won't be using Docker Compose, we'll be running on Kubernetes. For this part you'll need to write Kubernetes YAML specs to model out the application - save your file(s) in the project/kubernetes folder.
Start by getting the app running in your local Kubernetes cluster using the Docker images you published in your pipeline. You'll need to model the compute and networking parts of the app, but we'll continue to use the default configuration settings in the images.
🥅 Goals
-
Create Kubernetes YAML files to model the Widgetario application, with high availability and scale: 2 instances of each of the web and API components, and 1 of the database
-
Use the release version of your published images to run each component, but include an image pull policy to make sure the latest image is always downloaded
-
Your model needs to include networking between components, and into the web app from outside the cluster
-
We need to support different types of cluster, so your networking should include access for clusters which can provision an external load balancer, and those which can't
-
Include labels in your resource metadata to make it easy to identify all the components of the app
📚 Reference
-
Networking Pods with Services covers communication between components and into the Kubernetes cluster
-
Scaling and Managing Pods with Deployments includes running Pods at scale
💡 Hints
This isn't as bad as it looks. Remember that Kubernetes application models can be quite similar between projects, so you could start with an existing app as the basis and just tweak the setup for Widgetario.
Kubernetes needs more detail in the model, so you'll need to check back to the architecture diagram to make sure you're using the correct ports for network communication.
Start by running a single replica for each component and test them using the same endpoints you used in the pipeline to verify they're working (a port forward will help here). When you have the whole app running, then it's time to scale up.
🎯 Solution
If you didn't get part 5 finished, you can check out the sample solution from solution/part-5:
-
products-db.yaml - models the database with a Deployment and ClusterIP Service providing access on port
5432on the DNS nameproducts-db -
products-api.yaml - models the products API with a Deployment and ClusterIP Service providing access on port
80on the DNS nameproducts-api -
stock-api.yaml - models the stock API with a Deployment and ClusterIP Service providing access on port
8080on the DNS namestock-api -
web.yaml - models the web application with a Deployment and NodePort and LoadBalancer Services
Copy from the sample solution to the project directory - this will back up any existing Kubernetes YAML you had:
mv project/kubernetes project/kubernetes-part5.bak

cp -r solution/part-5/kubernetes project/
Now run the application using your local cluster:
kubectl apply -f project/kubernetes/widgetario
Check all the Pods and Services are created:
kubectl get po -l app=widgetario

kubectl get svc -l app=widgetario
And test the app at http://localhost:30008 or http://localhost:80
Part 6 - Continuous Deployment
Now we're ready to put this thing live! You'll add a deployment stage to the Jenkins build to send your Kubernetes manifests to a production cluster running in the cloud.
Your instructor will give you the connection details to your cluster - it will be a kubeconfig file, which you'll need to store in Jenkins
Your Jenkins instance has the kubectl command line installed, but your pipeline commands will need to load the kubeconfig file to connect to the remote cluster.
When you have your build working, you'll change a config setting for the web application. The build will run, package and publish new images and trigger the update in Kubernetes. Your site will then look like this:

🥅 Goals
-
Add to your Jenkins pipeline so new releases are automatically deployed to your production cluster
-
Print the LoadBalancer Service details after deployment - it will show a public IP address in Azure where you can browse to the app
-
When you have the pipeline working, verify that updates are deployed by switching the default theme to dark mode, setting this environment variable:
Widgetario__Theme="dark"
📚 Reference
We didn't cover this explicitly in the classes, but you should be able to piece it together. These resources will help:
-
Using credentials in Jenkins pipelines - includes using files as credentials
-
Using kubeconfig files with Kubectl - shows how to load an explicit config file for
kubectlcommands
💡 Hints
This is just a Kubernetes deployment, using the YAML files you got working in part 5. The only difference is you'll run the commands inside your Jenkins pipeline, and you'll need to load the configuration to point to your remote cluster.
Your production cluster is running in Azure Kubernetes Service which supports LoadBalancer deployments. It can take a few moments for a new LoadBalancer to get a public IP address, so you may need to trigger your pipeline a couple of times to see it.
There are different ways to set the dark mode config setting - if you do it in the Dockerfile then you may find the Kubernetes deployment doesn't get updated. That's because the Pod spec hasn't changed, so your pipeline will need to force a new rollout.
🎯 Solution
If you didn't get part 6 finished, you can check out the sample solution from solution/part-6:
-
Jenkinsfile - adds a deployment stage, runnig Kubectl commands with a specific kubeconfig file
-
web/Dockerfile - adds the new environment variable to set the default UI mode
You'll need to store your Docker Hub authentication in Jenkins - create a Secret file credential called aks-kubeconfig and upload the kubeconfig file for your AKS cluster.
For your first deployment, copy in the solution files - this will backup your existing Jenkins folder:
mv project/jenkins project/jenkins-part6.bak

cp -r solution/part-6/jenkins project/
Now add all the changes and push to Gogs:
git add --all

git commit -m 'Part 6 solution'

git push project main
Run the build again and check the logs. You should see the EXTERNAL-IP field in the output, which prints the public IP address for your app. If it says Pending then just repeat the build :)
If you need to debug and you want to run kubectl commands on the remote cluster, you can use the same kubeconfig file that you uploaded to Jenkins, e.g.
kubectl get svc --kubeconfig ./my.kubeconfig
Now you can test the update process. The sample solution sets the config setting in the Dockerfile, so the pipeline will build the image again and trigger a new rollout in Kubernetes.
Copy the Docker folder from the solution:
mv project/docker project/docker-part6.bak

cp -r solution/part-6/docker project/
Push those changes to Gogs:
git add --all

git commit -m 'Part 6 solution - update'

git push project main
And trigger another build. When the build completes and you browse again to your public IP address, you should see the site in dark mode.
Part 7 - Static Analysis & Binary Scanning
We have all the DevOps in our pipeline, but we're missing the Sec. Time to add some security tools, so we only deploy if we're confident the app is secure. We'll use SonarQube for static analysis of the code and Trivy to scan all the binaries.
Your job is to add both scans to the pipeline, so the application will only deploy if the images are free of security issues. In fact the images you build shouldn't get pushed to Docker Hub if there are security issues - the build should fail before the publish stage.
Not all the components support all the scanning tools, so we'll focus on those that do.
🥅 Goals
-
Add SonarQube scans for the Java products API and the .NET website. You already have SonarQube running in a container along with Jenkins and Gogs (you can generate a token for Jenkins to use at http://localhost:9000/account/security/, log in with credentials
admin/admin) -
Your build should fail if the static analysis produces a security rating worse than A for either component
-
Add Trivy scanning for the root filesystems of both API images and the web image (in production we'll use a managed database service, so we don't need to worry about the database image)
-
Your build should fail if the Trivy scans find any
CRITICALissues -
When security issues are found in the code or the binaries, the images should not be pushed to Docker Hub and the app should not be deployed
-
If the build fails because of security problems, you don't need to fix it at this stage
📚 Reference
-
Static Analysis - covers integrating SonarQube scans into Docker builds for Java and .NET apps
-
Security Scanning - includes running Trivy inside a Docker build to scan the filesystem of the final application image
💡 Hints
You could add the scanning as separate stages in the Jenkins pipeline, or integrate them inside the Docker builds. There are advantages to both options, but if you include them in the Docker build then developers can run the scans locally too.
SonarQube is running inside a container attached to the Docker network called cicd-infra. You can access the server from a multi-stage build at the address http://sonarqube:9000, if your build is using that network. That's a setting you can add in your Compose file but it's not supported by BuildKit so you'll need to set an environment variable in Jenkins to turn BuildKit off.
You'll need to log in to SonarQube to generate a token for the builds to use, but you don't need to create projects in advance - they'll be created when the builds run. You can use the exercises as the basis to add scanning, but be careful with the .NET app - the SonarQube tool needs to run in the same directory as the build.
Trivy can run as a separate stage in the Docker build, scanning the whole filesystem after the application image is built. Use the severity and exit-code flags to have the build fail if there are any critical issues.
🎯 Solution
The sample solution adds the scanning to the Docker build, with build arguments so you can turn scans on or off:
-
products-api/Dockerfile - adds SonarQube analysis to the build stage and Trivy scan as a separate stage; the web Dockerfile does the same, and the stock API Dockerfile just adds Trivy
-
build.yml - adds build arguments to enable SonarQube and Trivy, and runs the builds inside the
cicd-infranetwork so they can access SonarQube -
Jenkinsfile - turns BuildKit off and enables SonarQube and Trivy scanning in the build stage; if either of the scans fail, the build fails before running the test containers
You'll need to store your SonarQube token in Jenkins - create a Secret text credential called sonarqube-token and paste in the token you generated from SonarQube.
Then copy in the solution files - this will backup your existing Jenkins, Docker and Compose folders:
mv project/compose project/compose-part7.bak
mv project/docker project/docker-part7.bak
mv project/jenkins project/jenkins-part7.bak

cp -r solution/part-7/compose project/
cp -r solution/part-7/docker project/
cp -r solution/part-7/jenkins project/
Now add all the changes and push to Gogs:
git add --all

git commit -m 'Part 7 solution'

git push project main
Trigger a build and you should see the scanning happen during the build stage. Browse to the projects in SonarQube and you should see there are no big security issues. But the Trivy scan will fail for the products API - there are critical issues with the binaries in the underlying Debian image.
Part 8 - Using Golden Images
What a shame. After all that hard work we have an app we can't deploy because of a security issue in a component which we don't even control - the OpenJDK base image.
Now we have two choices: we can investigate the issue and see if it's a problem which can be exploited from the API, and add an exception if we think the risks are low; or we can try building the app with a different base image.
All the other components use an Alpine-based image, and they don't report any critical issues, so if we could switch the Java app to Alpine that should fix the problem. We can go one step further and build a golden image library for production apps, so we control the whole stack for each component and we have the basis of an SBOM (Software Bill of Materials).
Luckily we already have the Dockerfiles to build our image library. You'll need to create a new Jenkins pipeline to build the golden images and update the application Dockerfiles to use those images. Then the security issues should be fixed and the deployment will work again.
🥅 Goals
-
Add a new Jenkins job to build the golden image library from the
/infra/libraryfolder - that will build Docker images you can use as the base for Go, Java and .NET apps -
Update the Dockerfiles for the stock API, products API and web components to use the golden images for the application base - we don't have SDK images so we only need the final runtime images to use the library
-
The database image won't be used in production, so we don't need to make any changes there
-
Run the widgetario pipeline again and confirm the updates fix the build and deploy the new image versions to the production cluster
📚 Reference
- Golden Image Libraries - covers building and using your own image library
💡 Hints
The Dockerfiles, Compose file and Jenkinsfile are all there for you so it should be straightforward to add the library pipeline. You'll need to run that pipeline first and confirm the images are created before you can build the updated application images.
The library images use a custom naming scheme, so you'll need to make sure you work out the correct image tag to use in your FROM statments. We're not pushing the library images, so if you're pulling base images in your build then that may fail.
If you see any issues building the application images, it's likely to be that Docker can't find the libary images. Check they've definitely been built and you have the right image tags.
🎯 Solution
You can create a new pipeline for the library build by copying your existing pipeline, and setting the Jenkinsfile path to infra/library/Jenkinsfile. Build that pipeline and it should all work.
The sample solution updates the Dockerfiles and the Jenkinsfile for the app:
-
products-api/Dockerfile - uses
widgetario/java:jre-21.12as the base image for the application stage; the web Dockerfile useswidgetario/dotnet:aspnet-21.12, and the stock API Dockerfile useswidgetario/base:21.12 -
Jenkinsfile - removes the
--pullargument from the Docker Compose builds, so the build won't try to pull library images, it will use the local image cache
Copy in the solution files - this will backup your existing Jenkins and Docker folders:
mv project/docker project/docker-part8.bak
mv project/jenkins project/jenkins-part8.bak

cp -r solution/part-7/docker project/
cp -r solution/part-7/jenkins project/
Now add all the changes and push to Gogs:
git add --all

git commit -m 'Part 8 solution'

git push project main
Trigger a build and you should see the scans now all complete successfully, the application images are pushed to Docker Hub and the new version of the app is deployed to Kubernetes.
And now - over to you :)
Still got some time available? Good for you. You've built out a full DevSecOps pipeline here, but I'm sure you've noticed there are two problems with it. First:
It takes far too long to run
Hmm. Several minutes may not seem like a big deal, but it could become a bottleneck when we have dozens of developers pushing hundreds of changes every day.
You have a couple of optimization options you could pursue:
-
split the pipeline, so you have a CI pipeline which just does the build and a CD pipeline which adds scanning, publishing and deployment
-
switch to BuildKit, it's much faster but it needs some careful configuration to make sure SonarQube is accessible and the Trivy stages run
-
move scanning to separate pipeline stages, so they run outside of Docker and directly in the Jenkinsfile
There are advantages and disadvantages to all those which you'll need to think through. There's another problem too:
The deployment doesn't use explicit image versions
This isn't good, it means we can't tell just from the YAML files which version is running in production, because the release tag :21.12 is a moving target - production could be using an old image which is an alias of :21.12-5 where the latest image is an alias of :21.12-172.
Some options for fixing that:
-
move to GitOps for deployment, so the Jenkins pipeline just does the CI part and publishes images, maybe triggering another job which updates the YAML files with the new image version. Then you could use ArgoCD for the deployment to Kubernetes, running from the explicit version tags
-
use a templating tool for Kubernetes, which lets you inject variables into the deployment - Helm or Kustomize are the main options.